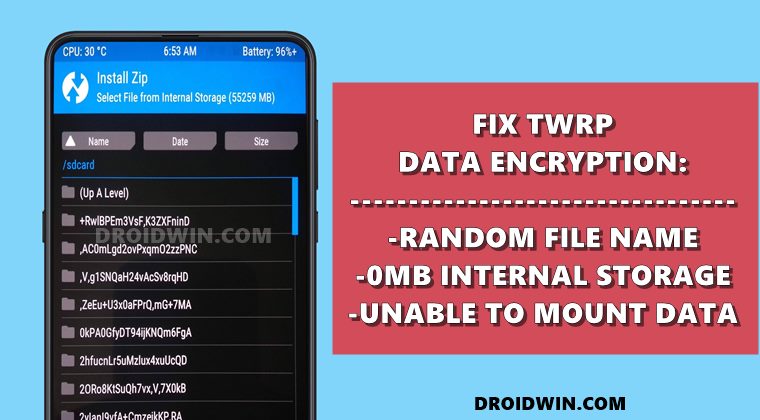
However, it isn’t free from its fair share of issues as well. One of the most common and concerning problems is related to Data Encryption. Without going into many technicalities, when this issue happens, all your file names will be in a jumbled form, with numbers and random strings of characters. In other instances, TWRP might show Internal Storage as having 0MB of consumed storage. All these straight away results in a plethora of issues. Among them, the most important issue is that you wouldn’t be able to identify the file that you have to flash. And we all know how disastrous could it be if we end up flashing an incorrect file. Furthermore, some users have even shared their horror stories as well. They planned to flash a new custom ROM, so they downloaded it and sent it to their device. Then they booted the device to TWRP and wiped the System partition. After that, they tried flashing the ROM but were unable to do so since they cannot identify which was the actual ROM file (due to an encryption issue). As a result, they were then greeted with the No OS Installed Are you sure you wish to reboot? message in TWRP. Well, I have already covered a comprehensive guide to fix that issue, let’s now turn our attention towards this one. Given here are the various methods that will help you to remove the data encryption and hence decrypt data in TWRP.
How to Remove Data Encryption and Decrypt Data in TWRP
We have shared a total of four different types of fixes. In my case, the last one did the job. However, I have mentioned it in the end because it requires a complete data wipe. So if you have already taken a backup and have no concern about data loss, then I would suggest you directly start off with the last fix itself. Others may begin from the first fix onwards. Droidwin and its members wouldn’t be held responsible in case of a thermonuclear war, your alarm doesn’t wake you up, or if anything happens to your device and data by performing the below steps to remove the data encryption and hence decrypt data in TWRP.
Note: Booting Android to TWRP
During the course of the article, you will have to boot your device to TWRP. For that, you may take the help of the device-specific hardware key combinations or refer to the below universal method:
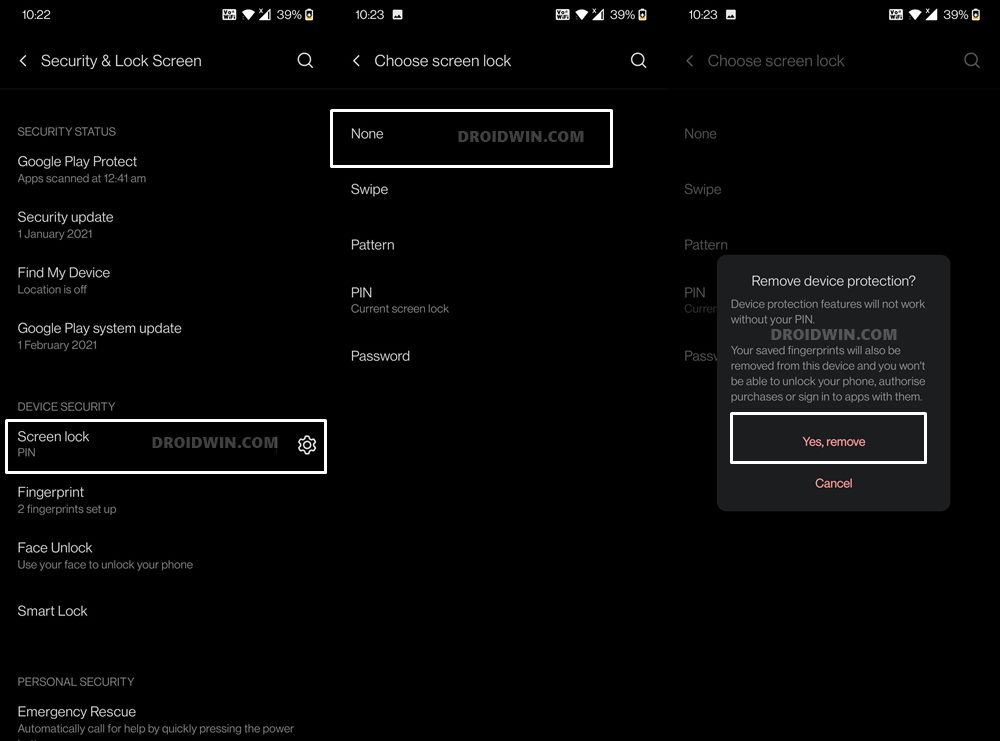
Fix 1: Remove Lock Screen
While it may sound like a pretty vague workaround, but most of the earlier Android devices (three-four-year-olds) and some even today have known to fix the issue via it. For the unawares, TWRP isn’t able to decrypt the data if you have enabled a Pattern Lock because it only supports unlocking via the PIN or Password. However, users are even stuck with these numerical passwords. So the best and safest bet is to temporarily remove all the lock screen protection from your device. Here’s how it could be done:
Once done, reboot your device to the TWRP Recovery and see if it is able to remove the data encryption and decrypt data or not.
Fix 2: Flash no-verity-opt-encrypt.zip via TWRP
While its name might be hard to spell but its task is pretty simple: to decrypt the data partition. As of now, this file wouldn’t be present on your device and you will have to transfer it via TWRP. However, don’t send it to the Internal Storage (because you wouldn’t able to identify the file). If you have a USB OTG or Pendrive, then connect it to PC, transfer the file, then connect the OTG to your device and flash the file. All the instructions related to the same are given in this guide: How to use USB OTG or Pen Drive to Flash File via TWRP Recovery. However, if you don’t have OTG, then you may try out the ever-useful ADB Sideload feature. For detailed instructions regarding the same, you may refer to our guide: How to Use ADB Sideload in Android [Stock and TWRP Recovery]. The shorter instruction follows below:
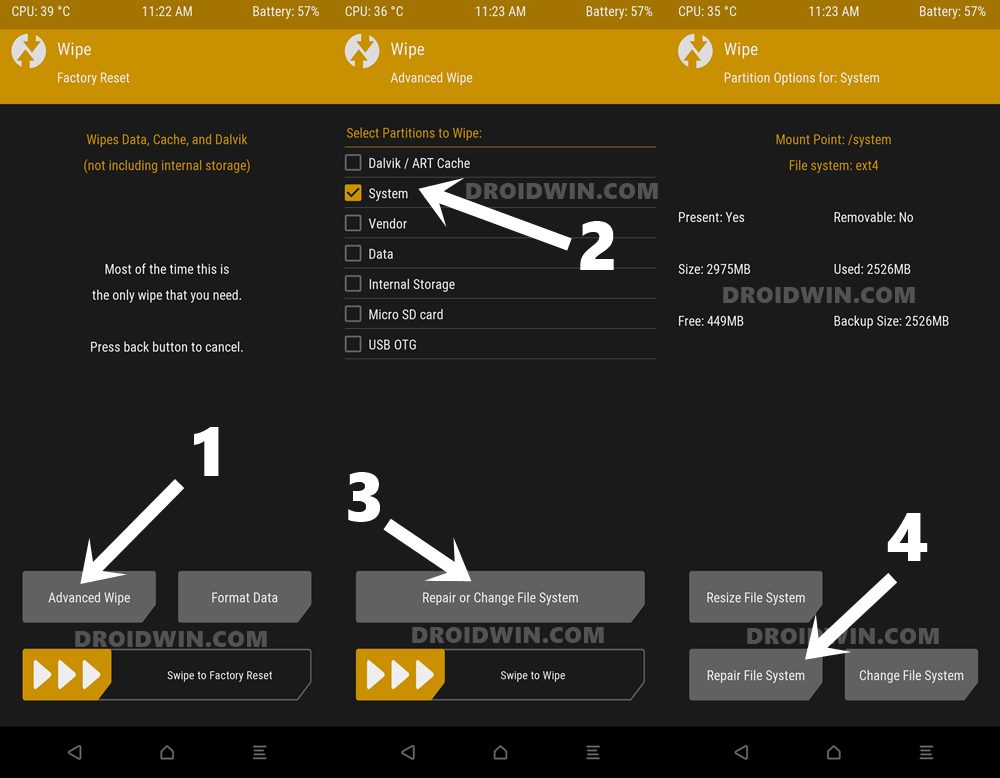
Fix 3: Change File System and Mount Data Partition via TWRP
In some instances, the issue isn’t as complicated as it might look. You only need to mount the data partition and TWRP then automatically decrypts the partition. To try it out, head over to Mount and checkmark the Data partition. See if it is able to fix the underlying issue. if TWRP isn’t allowing you to mount data, then you would have to Repair and/or Refresh the File Partition, which could be done as follows:
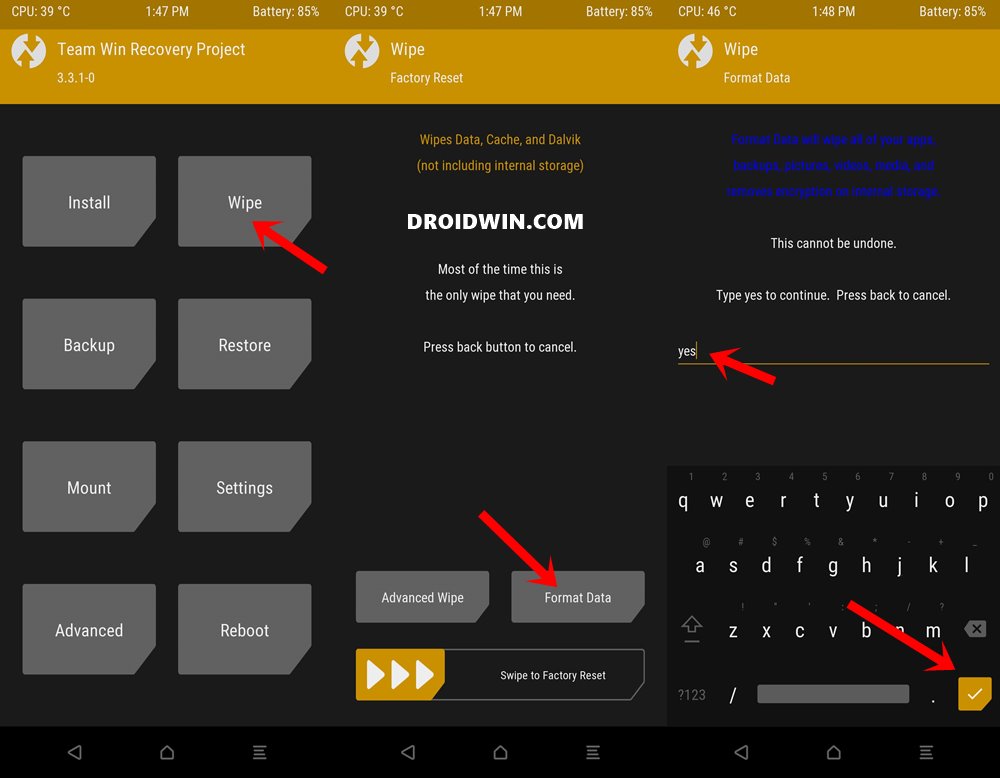
Fix 4: Format Data via TWRP
This will erase all the data from your device, so make sure that you have made a backup beforehand [and as mentioned before, this method did work out for me!]. Once done, proceed with the below steps:
So this was all from this guide on how to remove TWRP data encryption and decrypt data. If you have any queries concerning the aforementioned steps, do let us know in the comments. We will get back to you with a solution at the earliest.
How to Install TWRP Recovery on AndroidFlash Custom ROM After Wiping Internal Storage Without SD Card or OTGHow to Install MIUI Stock ROM on Xiaomi via TWRP RecoveryHow to Flash Stock and Magisk Patched Boot.img via TWRP
About Chief Editor