While the Note 9 last got the official Android 10 update, you could now even welcome the twelfth iteration of the OS. So the likes of the new Material You theming engine, Smart Calendar, Smart Widgets, additions to Samsung Pay, virtual RAM allocation, the ability to use all rear camera lenses in Pro Mode, and using the ultra-wide camera in third-party apps are some of the noteworthy goodies that you are about to welcome onto your device. So without further ado, let’s check out the steps to install Android 12 onto your Galaxy Note 9.
What is Noble ROM: Features and Bugs
One of the most popular names in the Samsung Community, this custom ROM has always been known to provide the latest OS upgrades to devices whose official update cycle has long ended. For example, both the Galaxy S9/S9+ and Note 9 came with Android 10 out of the box and got their last official update as Android 10 (One Ui 2.5). However, Noble ROM did the noble cause of blessing these devices with Android 11 and then the latest 12 (both One UI 4.0 and now 4.1). What we really like about this ROM is the fact that it has managed to maintain an equilibrium between the features and stability front. So it manages to checkmark all the required feature sets but at the same time wouldn’t give you a bloated experience. Moroever, it uses the Arome Installer, hence you will have complete control what all the features you want and what you don’t, right at the initial installation itself. On that note, here are some of its other noteworthy features that deserve your attention:
Features
Bugs
You could keep a track of all the bugs as well as the estimated time for their fix in this Google Sheets.
How to Install Android 12 (One UI 4.1) on Samsung Galaxy Note 9
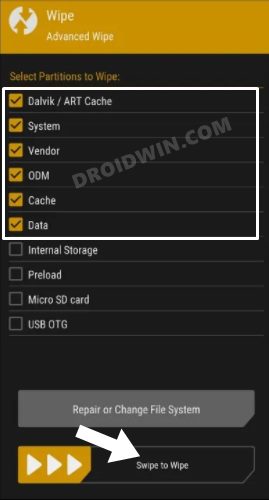
The below process will wipe off all the data from your device, so take a complete device backup beforehand. Droidwin and its members wouldn’t be held responsible in case of a thermonuclear war, your alarm doesn’t wake you up, or if anything happens to your device and data by performing the below steps.
STEP 1: Unlock Bootloader on Galaxy Note 9
First and foremost, you will have to unlock the device’s bootloader. To do so, you may refer to our comprehensive tutorial on How to Unlock Bootloader on Samsung Galaxy Note 9
STEP 2: Install TWRP on Galaxy Note 9
Next up, install the TWRP Recovery onto your device as it will be sued to flash the Android 12 ROM. So refer to our guide on How to Install TWRP Recovery on Samsung Galaxy Note 9.
STEP 3: Download Android 12 ROM for Galaxy Note 9
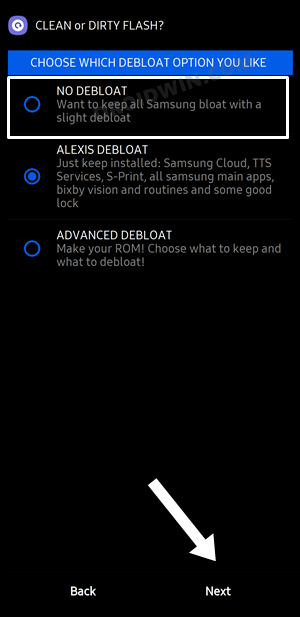
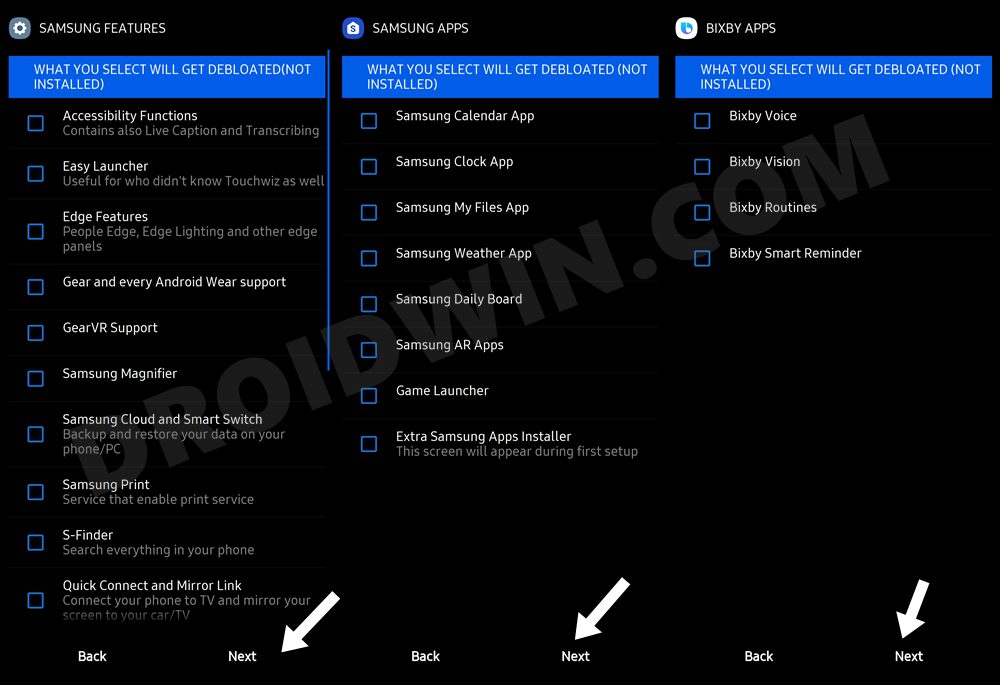
Now download the One UI 4.1 ROM based on Android 12 corresponding to your device and variant from below [Credits: XDA Recognized Developer alexisxda.6114446]. Along with that, also download the HotFix ZIP file (attached below). This will fix some of the underlying bugs and issues.
NOBLEROM2.1_N9_S9_S9P.zipNOBLEROM2.1_N9_S9_S9P_NVARIANT.zipHotfix ZIP
STEP 4: Install Android 12 on Galaxy Note 9
With this, we round off the guide on how you could install the Android 12 One UI 4.1 ROM on Galaxy Note 9. If you have any queries concerning the aforementioned steps, do let us know in the comments. We will get back to you with a solution at the earliest.
Inaccurate Material You Color Palette in Samsung One UI 4.1Enable 120Hz Refresh Rate in Power Saving Mode in Samsung One UI 4Samsung One UI 4 (Android 12) notifications font size too small [Fixed]How to Root Samsung One UI 4.0 Android 12 via MagiskDowngrade Samsung One UI 4.0 to One UI 3.1 (Android 12 to 11) via Odin
About Chief Editor